Showing posts with label revamped t-shirt. Show all posts

Thursday, September 16, 2010

"Let's Get It On"...& Revamp this shirt!

I recently shared my pledge to re-fashion my wardrobe in an effort to add some funk to my closet, keep money in my pocket & save the planet!  It's a fun & practical challenge that I am really excited about participating in.  You can read more about the challenge here: Wardrobe Re-Fashion

I had a super soft brown UFC t-shirt I bought way back in August of 2006...UFC 62 - Liddell vs. Sobral.  It's an extra large and is a bit frumpy on me now...time to cut it up & refashion it.

My first step was to find a good fitting shirt that I liked which will be used as my pattern.  It's comfy & flattering...simple too.  =)
I put my UFC shirt on top of my "pattern" shirt, matching up the sleeves & neckline, then using a sliver of rescued bar soap...hey, it's readily available & marks your fabric nicely!


Then I cut the neck off my shirt...once again using the scrap of soap to mark my cut line.


I have to say...it was pretty liberating to grab my scissors & cut up my shirt!  =)


To create that simple little gather at the bust, I stretched & pinned 2 1/2" of elastic, stretched over 4" of fabric...then stitched it on.  


The tricky part is that you have to hold on tight to the elastic while you stretch & sew it.  I found it helpful to crank my presser foot down a few notches.

 This was surprisingly simple with great results.


I should have stopped right here...but I didn't!  I got the bright idea to cut up the back...wanted to try some lacing.  I cut the shirt straight up the middle of the back, then made a "V" shape on top.  I tried it on & pinned it to fit comfortably. 


I liked it so much at this stage, but really wanted to try that new leather cording I just got my hands on...so I punched some holes in it every inch or so on each side...then laced it up.


I wasn't in love with my bra showing through the back...and I sewed it back up!  Much to my dismay, it was now too small...so I'll have to revamp it again.  I think I'll make another t-shirt dress with this shirt...but I'll leave that for another post!  Can't be afraid to just go for it sometimes...lesson learned!  =)


Wednesday, August 25, 2010

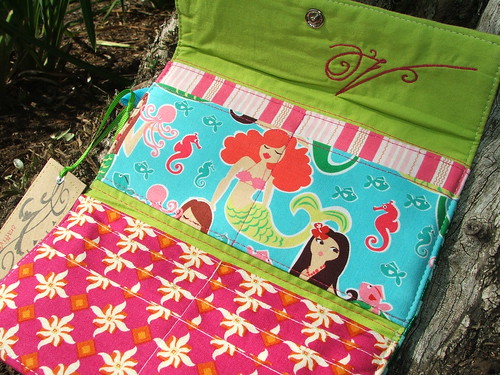
Mermaid Wallet #3


Mermaid Wallet #3, originally uploaded by Nonerz.
Something new in the Etsy shop today...it's a funky Mermaid Wallet. Pick it up here:

http://www.etsy.com/listing/54741256/victorious-vixen-edgy-mermaid-wallet-3

I added some spice to my latest Revamped Turquoise & Black T-shirt Dress...a funky fresh skull cell phone pocket on the side and will be posting pics of it soon, so stay tuned!

I've had a great response from my Revamped T-Shirt Tutorial ...thanks for checking it out & sharing it with your peeps! I'd love to know what sizes & designs you'd like to see in my shop.

I hope you're having a great week!
--Nani

Saturday, August 21, 2010

Revamped T-shirt Tutorial


Well, I sure had a lot of fun with this next project.  I was trying to get my sewing mojo back...seemed to have hit a creative block.  I have read a few books about upcycling old t-shirts into cool tops, skirts & other things and decided it was time to just GO FOR IT!
 What you need:
t-shirt (s)
scissors
needle & thread

Makes life easier to have:
rotary cutter
ruler or straight edge
sewing machine
dress form (I made mine!)


I got this green shirt from CALDA, California Lyme Disease Association, and thought it would be great to revamp it into an attention getting outfit.  
  • I started by cutting off the sleeves with my ruler & rotary cutter (the thing that looks like a pizza slicer).  If you don't have one of these, just use a pair of scissors to do the job.  Having the rotary cutter will give you a nice even edge to work with, making it easier to match up when you're sewing.

  • I carefully cut out all the portions of the shirt with writing on it & set it aside.

  • I cut the sleeves open (just follow along the seams) & trimmed it to make green strips.
  • Then, I did the same thing to 2 black t-shirts of mine.
  • Next, I pieced the shirts together in a crazy quilt type fashion...there are NO rules when you are the designer!  =)  I like that a lot. In fact, I didn't use a pattern or anything, just cut, pin, sew & go.  I also wanted my stitching to show, so I sewed them together with wrong sides together, alternating from a straight stitch to a big zig zag stitch on my seams.
  • I created a long chunk of fabric that was pieced together & fit it to my dress form...I did have to fit it on myself when I got to the bottom of the dress since my dress form doesn't have a booty!  Just pin to a comfortable fit and sew this bad boy up!
  • I used a scrap of pieced fabric for the strap...sew it in half lengthwise & zig zag stitch the ends to the dress.  I wanted mine to be a halter but you can criss cross them in the back or do it however you want.
  • Lastly, I stitched the CALDA logo with the tick onto the front lower part of the dress & added some additional lines of stitiching for a bullseye effect.

That's it!  I now have a funky fresh attention getting lyme awareness outfit...and I have to say, I feel pretty darn good in it AND it's super comfy too!  Definitely think it's LymeSexy...what do you think?